This article was first written in 2003 and has been updated six times since then. It was updated again on my byThom Web site with reviews of several tripods. I'll note that there are many more acceptable leg options now than there used to be, but the premise I present is still true and will remain true: you'll save money if you just get the right support in the first place. I need to do another refresh of this article soon, as we have many more new options that have appeared in the last year or two. I've done a modest update for the new site.
One of the things that comes up at least once at every workshop I teach is that someone is photographing without enough support. I don't mean my teaching and cheerleading is failing the student. I mean that they just aren't providing a secure platform from which to photograph.
Thom's Maxim #1: You're wasting money on expensive lenses if you fail to give your camera a stable platform.
Yes, I understand that sometimes you have to hand hold your camera to get a shot, and that some types of photography require you to be mobile and flexible. But better hand holding technique is a discussion for another article. Likewise, the prevalence of image stabilization also has people thinking that they can get "stable" images in any situation while hand holding their camera.
Today, though, we're talking about getting the kinds of photos I do, where we're not in a hurry and can use a tripod.
So, let's pop our cameras onto a tripod and photograph. "Hey, why do I see your camera drooping on that tilt-down image? And did I notice the end of your lens vibrate a bit when you pressed the shutter release?" Hmm. Well, you're not going to like hearing this, but you shouldn't have purchased that 17-55mm AF-S lens. You'd be better served by getting the less expensive 18-55mm Nikkor and spending the money you saved on a better support system. (Why does it feel like I said that a lot in the mid-00's?)
Even when students come to a workshop with a good tripod and head, they aren't always using it as securely as they should be. The bottom line is simple: if the camera is moving when you photograph, you'll never resolve what the lens is capable of. Other factors enter into the picture, too.
If you mount your camera on a decent tripod but hang a heavy lens off the front (like the 70-200mm f/2.8), you can actually get the center of gravity far enough out from the leg support that the front of the lens still moves a bit during exposure. And on many DSLRs, there's tangible "mirror slap" vibration that shows up with telephoto lenses when the shutter speed is in the 1/2 to 1/15 range. I usually suggest either avoiding the 1 second to 1/125 range unless you have a solid platform and use either mirror lockup, or the shutter delay option.
How do you tell if you've got a problem?
- Mount a longish lens on your camera and tripod (a 70-200mm or similar will do).
- Frame an image with the tripod head loosened.
- Tighten the head down. Did your framing move? If yes, then you've got a bad head.
- Now take a 1/4 second exposure (why 1/4 second? I want the shutter to move in two actions, not one continuous one) while carefully watching the front of the lens. Did you see it move up/down/sideways in any fashion? If yes, then you've got a bad head and/or legs.
- Another possible test: lock the camera down. Pull down on the front of the lens slightly and release. It shouldn't move.
Thom's Maxim #2: You can spend US$2000 to buy a good tripod and head, or you can spend US$1000 and do the same thing. (Corollary: eventually you'll do one or the other.)
Here's the usual sequence that most photographers go through in getting to a stable platform:
- First they try handholding. Eventually they realize that their results aren't as sharp as those of others.
- The next step is to work on improving technique. Elbows get tucked, the camera is braced against stable objects, they stop holding their breath, etc. But that doesn't solve every problem or work in every situation. And it certainly doesn't always work for very long lenses.
- Next comes image stabilization. After all, it's designed to take equipment movement out of the image. It does, but it's not infallible, nor does it solve every problem, especially as you start trying to take two-second photos of waterfalls to get milky water action. At the other end, above 1/1000 image stabilization may actually remove a bit of acuity.
- Now we find our photographer at the store buying a tripod. It's one of those low-cost tripods with braces between the legs (that's gotta make it stable, right?) that weighs a couple of pounds and has nice looking aluminum legs (US$75). This solution seems to help with the middle focal lengths, at least. But eventually the bottom section of one of the legs gets a bit bent and doesn't collapse back into the other sections easily. And with long or heavy lenses, the head "creeps" when the camera is pointed downward. The whole thing shakes in the wind, and you can't get down to ground level for images. In fact, the photographer finds that they're spending way too much time fighting the tripod rather than taking pictures.
- Since it seemed the light legs had to be part of the problem, the next step is buy a heftier pod (US$125 min; US$200 spent so far). That usually turns out to be one of the classic Bogen legs (3021 was a popular choice for some time) with a two handle pan/tilt head. This solves one of the problems: the bottom leg section doesn't get bent with use. And used correctly, better legs solves the basic stability problem, as the heavier weight and sturdier leg sections at least give the whole thing a solid base. But now the problem seems to be that our photographer is constantly fiddling with the head (pan/tilt heads were designed for video cameras, not still cameras). Getting the camera level becomes a chore. Getting a scene locked down doesn't always work the first time, either (that head sag, again).
- So we start the procession of the heads (US$50, US$75, US$125, US$200, plus eventually some proprietary quick plates at US$25 or US$50 each; at least US$700 spent so far). The first attempt at a new head will usually be a "better" variant of what they had, or perhaps a very small, cheap ball head. Neither will fix the problems our user has, and the primary problem will still be getting the camera level quickly, so the next head is usually the "pistol grip" type, because it seems to be "faster." Problem still not corrected (and verticals are now a bit of a problem), so we start the ball head parade. The first "decent" ball head will be one of the Manfrotto (Giotto) heads, perhaps with a built-in plate system of some sort. That starts to work better, but the photographer still finds that the camera moves a bit when they turn the knob to lock the ball. And some of the plate systems have just enough slop in them that the compromise the stability of the entire system (another problem is that few of them "grip" the camera bottom in ways so that they can't be turned; they eventually work loose and end up marring the camera bottom's finish). So we try another, larger ball. Still, our prototypical photographer doesn't "go all the way" just yet because it seems ludicrous to spend US$350 on a head that mounts onto a set of US$125 legs, right?
- The legs are starting to make their shortcomings known. They don't let you get down to ground level (or, if you've got a Bogen with the "trick" centerpost, the stability isn't great in some positions). And the whole concoction is starting to get a bit on the heavy side (depending on the legs and head, perhaps as much as 7 pounds). So a set of Gitzo carbon fiber legs is next on the list (minimum US$550; minimum US$1250 spent so far). Upon acquisition of decent legs, it immediately becomes clear that the head is the sole remaining problem point, so...
- Our photographer breaks down and buys an Acratech, Kirk, Really Right Stuff, Markins, or an Arca Swiss ball head (US$350 plus US$100 or more for plates; total spent: US$1700 or more). A few folk take a short detour here and buy something like the Linhof Profli II ball head (US$250). And they find that that head fixes every problem except one: the darned thing won't stay firmly screwed onto the legs without using Locktite on it.
So, for more than the cost of one pro grade Nikkor (with filters and a new case to put it in) the photographer can finally see the ultimate quality of their lenses.
Or...you could just skip all the intermediary steps and buy the final solution first. Just to clear, here's what I recommend for the kind of nature shooting I do (note: these recommendations will be updated sometime in 2021):
- A Gitzo carbon fiber tripod or equivalent (US$500-$1000). Gitzo's come in a lot of flavors, so take your time figuring out which one you want. The primary choices are: number of leg sections, length of the leg sections, and center post options. With the 6x revision to their carbon fiber line, Gitzo has totally confused everyone, including their Web master. Here's the short version (longer version at bottom of page):
- "Mountaineer" is the traditional Gitzo style and closest to the original carbon fiber Gitzo, just updated with the new leg locks and better tubes.
- "Traveler" is a unique version that folds backwards on itself to remain smaller during transport.
- "Leveling" means it's basically a Mountaineer with a leveling base.
- "Systematic" are the heavy duty tripods and generally don't include a center post.
- "Explorer" has the offset centerpost that can be rotated into non-vertical positions.
- We're looking for support here, so only the Mountaineer, Leveling, and Systematic models really need apply. I believe the other two lines compromise stability too much, and even the leveling versions of the smaller models are iffy in stability, in my opinion. The 0, 1, 2, 3, and so at the start of the name on indicate the tube size. Some of the smaller tube sizes have a tendency to resonate wind and shutter vibrations, which makes them not good choices. In general, I recommend you avoid the 0 and 1 series if you're using any serious DSLR and going for solid stability. The 2 series works fine with D200-sized cameras with lenses up to the 70-200mm; the 3 series is recommended for anything larger. A G at the end of the name means it has a geared center column, which I recommend you avoid. The last two digits in the four-digit number indicate number of leg sections (30 = three, 40 = four, etc.). Get three if you can, but understand that the packed size will be longer, so you may need to check your luggage size first. Personally, I travel with smaller duffels and tend towards the four-section Gitzos, even though they compromise overall stability a bit. The usual choices for the weight conscious end up: the GT2530 if you're interested in the lowest possible weight (3.2 pounds; 1.4kg) or the GT2540 (which I use) if you want the same but need to pack it in carry-on sized luggage (the GT2530 collapses to a little over 25", the GT2540 to 22"). If you're not weight sensitive or need to run large teles on your pod, the Gitzo GT3530 is a far better choice, as it's a bit heavier and sturdier (4.7 pounds [2.1kg], 26" minimum size). Indeed, a few folk, such as macro enthusiast John Shaw, think this is the bottom of the line you should consider.
- There are many perfectly acceptable "equivalent" legs. Look carefully at the Bogen, Giotto, and Manfrotto lines and you'll find good solid legs that accomodate the heads I mention below. Generally you pay a weight penalty for anything that's not carbon fiber, though. The Gitzo Basalt tripods are adequate compromises between price and weight, but you can do better. The best price compromise for non-carbon fiber legs are the Manfrotto models, such as the 190XProb for US$170 (4 lbs). But those pounds add up if you have to carry them far. You may choose to purchase one set of legs or do as I do and buy two. If you had to downgrade anywhere in this list, the legs would be the place to do it, in my opinion. That's because with good legs (you're only going to consider the good ones, right?), you can usually use set-up discipline to keep things steady. In other words, you don't extend fully, or don't splay the legs wide, or hang weight from the centerpost.
- Or you can just go for the Mercedes of the tripod legs: the Really Right Stuff Versa. I use a Versa 2 for most of my lighter gear, a Versa 3 for the really big lenses. And yes, it is better than a Gitzo. Less ringing in the legs after mirror or shutter slap, much more solid support, and a host of small features that were clearly well thought out.
- A good head (US$350-500). That usually means one of the following brand heads: Arca Swiss, Benro, Kirk, Markins, or Really Right Stuff. And don't buy at the bottom of these lines if you ever want to mount something more than the 70-200mm on your rig. That means the Kirk BH-1 or RRS BH-55 or Arca B-1 generally. Do not skimp here. You fiddle with the head on your tripod so much more often than the legs that any frustration with the head will very much aggravate you. Remember, you can use this head on multiple leg sets.
- Plates for everything (US$50 to US$400). Kirk Photo or Really Right Stuff Arca-style quick release plates for each camera body you own, and for each lens that has a tripod collar. Should you get L-plates for your camera? Probably, as it gives you more flexibility, especially if you think you want to do panoramas. Is there a difference between the two plate systems? In terms of mounting, no, in terms of quality and features, most of us pros think the RRS plates offer a bit more polish and ability.
So, you're in for a minimum of US$800, but more likely somewhere around US$1000-1500. You still would have saved money had you just opted for this approach from the beginning.
If you need a less expensive solution and know you won't be using lenses over two pounds (basically under 300mm), there's another solution I can recommend that gets you almost everything the other does:
- One of the knock-off carbon fiber legs (US$300-500). The Benro C2580F or the Induro CT213/214 come to mind. But there are probably a half dozen SE Asia carbon fiber variants now that would suffice. Most of these knockoffs are targeting Gitzo and have similar numbering schemes (i.e., the 2's and 3's are probably where you need to look; skip the 0's and 1's).
- Acratech Ultimate ballhead (US$290). A strange looking head, but it is light (1 pound) and works quite well. I especially like the fact that I can keep the ball clean while traveling in hostile environments. Strongly consider getting the rubber knobs (an extra cost option), as the metal knobs are rough on the hand when you do a lot of fiddling. Now that Acratech makes four heads, which one should you get? Well, I'm a fan of the older model (Ultimate Ballhead) myself, even though it has a tendency to pinch your fingers now and then. It's just simpler and easier to clean. The V2 fixes the pinch problem, and the GV2 and AZ work better with long lenses, but frankly, if you're using long lenses, you generally aren't interested in saving weight (you don't want the mass above the head to outweigh that below it). Alternatively, the Kirk BH-3 head is a little heavier (20 ounces), but more traditional in design, as is the Really Right Stuff BH-40. Markins also makes a lighter ballhead that's acceptable.
- Plates, as above.
This option gets you in the door for US$600+ and weighs in at about 4.5 pounds, even less if you use a short centerpost (or none) on the legs. Just don't expect to mount your 300mm f/2.8 on it and be happy. (I originally had a note in #2 above that confused even the Acratech folks; they thought that I was saying that their head can't hold more than 4 pounds. There are two intersecting issues here: (a) how much weight the head can hold at an angle without moving position; and (b) how much weight you can place at the top of a light object and still expect the system to work as 100% solid support. So let me clarify: the Acratech head can hold very large loads (perhaps 10 pounds or more), but if you place a D4 and 300mm lens on top of a 4.5 pound support system, you've compromised the support abilities, regardless of what the head can hold. The old rule of thumb was that your tripod/head needed to be 1.5x (or more) the weight of what was on top of it. These days, new materials and designs let you get down to about 1x—assuming that you have the right gear and have a disciplined technique—but beyond that you're just asking for problems, especially with long lenses or slow shutter speeds. So, to reiterate: I very much like the Acratech head, and use it while backpacking; just don't expect to create a <4-pound support solution that can support >4-pounds of weight on top.)
And speaking of the long, heavy telephotos: if you use the 300mm, 400mm, or 500mm telephotos, at a minimum get a Wimberley Sidekick (US$250). This clever device has to be used to be appreciated. Essentially, it's the perfect way to get the weight of the camera and lens balanced and stabilized on your pod. If you use long lenses all the time or anything greater than the 500mm, consider getting the full Wimberley gimbal head instead (and perhaps even heavier legs). A 600mm f/4 on a Wimberley head moves effortlessly enough to track flying birds, yet gets enough support to render sharp photos. I've seen a lot of other gimbal options, but the Wimberley still seems to be the clear winner.
Finally, a word for you small systems camera users (e.g. mirrorless): it's possible that you can get by with less tripod. I've successfully managed to get good shots with Olympus Pen cameras with the Benro C-0691 (with B-00 ballhead), which sells for US$450 and folds into a very small, 2.5 pound (1.1kg) package. But…you need to really pay attention when using something this small and light:
- Leg extensions are your enemy. Use all five leg sections and there will be motion in wind and with mirror slap. Keep the bottom two sections tucked in and the whole thing is relatively secure, though not remotely close to eye level.
- Make sure the center post is locked down tight and hang weight from it if you can.
- Push down on the top of your camera while taking a shot (be careful not to add motion!
- Watch the swivel points: my Benro has a tendency to get loose at the leg swivel after air travel.
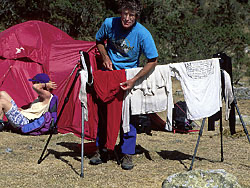
And with two sturdy tripods (ball head not necessary) you can do laundry. The late Galen Rowell (and wife Barbara relaxing near tent) doing a bit of mid-day house chores near Alpamaya, Peru:
A Good Tripod and Head Should:
- Set up in seconds, without fiddling.
- Hold its position no matter what the angle of the camera.
- Be completely field cleanable.
- Go from ground level to full height without compromise.
- Lock all positions securely enough that you're comfortable walking away from the tripod even on windy days.
- Be able to follow action and still provide support.
- Resist all attempts to bend and break (Galen used to demonstrate his Gitzo 1228 by standing on it).
- Allow the camera to go from horizontal to vertical orientation instantly.
- Be dragged over rocks, through mud, sit in the ocean, or any other environment you want to shoot in, and show nothing more than a few scratches for the effort
- Be light enough to always carry with you.
- Be heavy enough to hold your heaviest lens and body secure in the worst possible conditions and at the worst possible angle.
- The solutions I suggest meet all those requirements. Does your current tripod and head do the same?
Gitzo Cheat Sheet:
The new Gitzo 6X line has model numbers that look something like this: GT####XX. Here's the basic cheat sheet:
- GT = Gitzo Tripod (as opposed to GM which is Gitzo monopod)
- First two ## is size of legs, with 05 being the smallest diameter and 55 being the largest. 05 and 15 work only for very light cameras. 25 and 35 are what DSLR shooters are looking for. 55 is best for studio or serious wildlife shooting.
- Second two ## is number of leg sections, with 30 is three section, 40 is four, and 50 is five, and 60 is six. You want three if you can, four max.
- XX is a designation of type and/or option (both may appear in a name and Gitzo isn't 100% consistent, but these are the main ones):
- T = traveler
- EX = explorer
- L = long
- LVL = leveling
- S = systematic
- G = geared center
- V = video bowl
- nothing = mountaineer
The traveler is only good for light equipment, and I don't recommend the geared or explorer center columns.